 Skip to content


DIY Project: Direct Heat Smoker
Joe shows us a DIY video of a step-by-step process on how to build your own smoker that uses directed heat to cook what you want to eat. If you love to cook outdoors, follow this video to get clear instructions and helpful tips to create a smoker that would impress all of your friends and family.
This video provides detailed instructions on how to choose the materials and equipment needed, and how to build every part. Also, it gives tips and tricks on how to get the best results from your smoker, including seasoning the smoker before use. Let’s make it and revel in it!
1. Materials
- 3/16 4' x 8' steel plate (quantity: 1)
- 1/4 10" x 35" steel plate (offcuts from steel yard) (1)
- 1/8 12" x 24" steel plate (offcuts from steel yard) (1)
- Half sheet of 3/4 expanded steel (1)
- 1 1/2 x 1 1/2 x 10' x 1/8 square steel tube (1)
- 2 x 3/4 x 10 x 1/8 C channel (1)
- 3/4 x 10' angle iron (1)
- 1/2 x 24" angle irons (offcuts from steel yard) (2)
- 1/2" x 36" solid round bar (offcuts from steel yard) (1)
- 3/4" x 36" round schedule 40 (offcuts from steel yard) (1)
- Bullet hinges (4)
- 16" 4x4 square steel tube (offcuts from steel yard) (1)
- 3/4 x 1/8 x 10' flat bar (1)
- 4" casters (4)
- 20 x 24 1 1/2" thick fireproof ceramic insulation (1)
- Thermostats (2)
2. Equipment
- YesWelder MP200
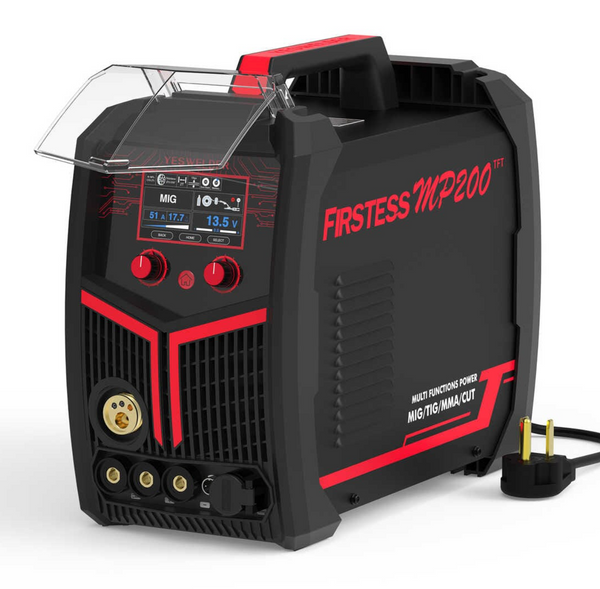
YesWelder FIRSTESS MP200 5-in-1 Welder & Cutter
- YesWelder CT2050

YesWelder FIRSTESS CT2050 Powerful 7-in-1 Welder & Cutter
- YesWelder .035 solid MIG welding wire

ER70S-6/10LB-0.9 .035" 10LB Spool Carbon Steel Solid MIG Welding Wire
- Angle grinders
- Flap discs
- Grinding discs
- Cutting discs
- Wire wheel
- Hole saw bit
- Bolts, screws, nuts, and springs
- Metal chop saw
- 14" evolution metal blade
- MIG gas 75% Argon 25% CO2
3. How to season the smoker
- Cooking spray oil
- Boiled linseed oil
- Rags
- Charcoal
- Propane torch
4. Produces
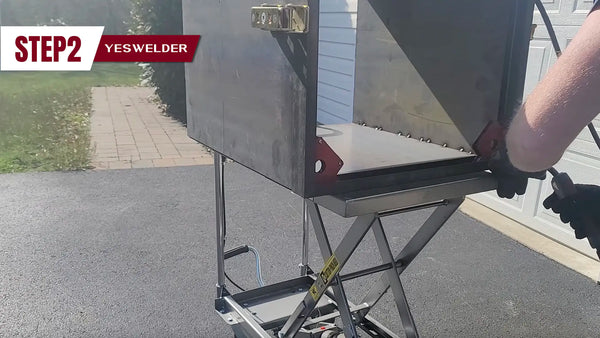
4.1. Cut and weld the steel plates to create the main body of the smoker, and construct the insulated bottom using steel plates. (00:20)

4.2 Build the lid using C channel for the sides and steel plate for the top, and front lip. (02:16)
4.3 Cut out the front of the box for easy access to the food. (02:55)

4.4 Weld the bottom of the main box and make space for ceramic insulation. (03:21)

4.5 Install and secure ceramic insulation. (03:55)

4.6 Weld the front door and attach hinges. (04:46)

4.7 Weld 1-inch flat bar on the lid for a tight fit when closed. (05:56)

4.8 Cut and assemble steel pieces to build a base to make the cooking grate off the ground and attach casters. (07:53)

4.9 Create a cooking grate using angle iron and expanded steel. (10:11)

4.10 Create a door latch using 3/16 inch steel. (11:37)

4.11 Install vents for airflow control. (12:07)
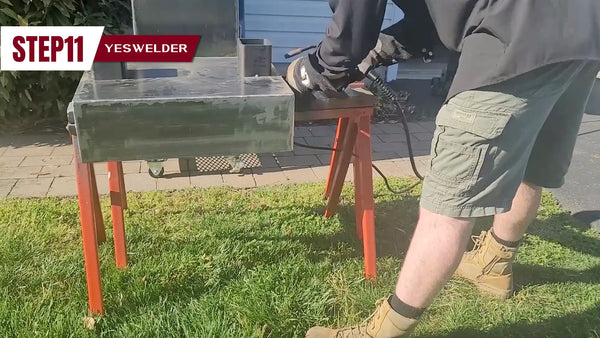
4.12 Add a handle to the lid for easy opening and closing. (14:06)

4.13 Install dampers by using steel plates, a screw and tension spring. (15:05)

4.14 Construct a slide system for side vents using steel plates and tracks. (15:28)

4.15 Drill holes for vent openings and install a handle for adjusting the vents. (16:00)

4.16 Season the smoker with oil to protect the metal and improve flavor. (17:31)

👏 Follow us for more amazing videos!
Thank you to Joe for DIY project. You can follow his YouTube channel
@harbaughsworkshop here.
👏 You may be interested in the following:
2 comments


Thank you, David! You can check out our welders at this link – <https://yeswelder.com/>
Looks like wonderful welder
Leave a comment