
6 Simple Shelters You Can Assemble in under 15 Minutes
Shelter is a survival must-have, which is why it is critical for everyone to know how to build simple shelters in a matter of minutes.
The survival “rule of three” states you can survive three minutes without air, three hours without shelter in a harsh environment, three days without water, and 3 weeks without food.
Shelter is second on that survival list – directly following oxygen.
This means if you find yourself in a desperate situation, you need to prioritize building a shelter – quickly.
Thankfully, many different shelters can be built within a matter of minutes.
What to Pay Attention to As You Build a Shelter
Before you start building your shelter, you want to consider what is around you.
Your location matters.
You want to choose the safest location possible for your shelter. This means looking for an area that is dry and flat. Avoid areas under trees or branches that look dead.
You also want to make sure you are in a location where you can easily build a fire.
In addition to the location, pay attention to the natural resources available, such as trees and fallen limbs, to help you build a shelter.
1. Lean-To
One of the most common simple shelters to build quickly is a lean-to. It’s all in the name.
A lean-to is a shelter made by leaning limbs against another object (a large rock, a fallen tree, etc.).
You create a wall as you lean branches against the object at an angle. Then, cover the leaning wall with debris, such as leaves, pine needles, bark, or any other natural resources.
The thicker you build the wall, the more insulated it will be.
Once you have built a thick wall leaning against the main structure, you can crawl inside and find shelter.
You can also create a lean-to using two close trees and a long branch. If you find two trees close together, you can build a lean-to by securing a long, sturdy limb between the two.
Once the limb is secure, you lean brush or branches against it to create a wall.
After the basic wall is constructed, use anything you can find (debris, brush, weeds, etc.) to thicken the wall.
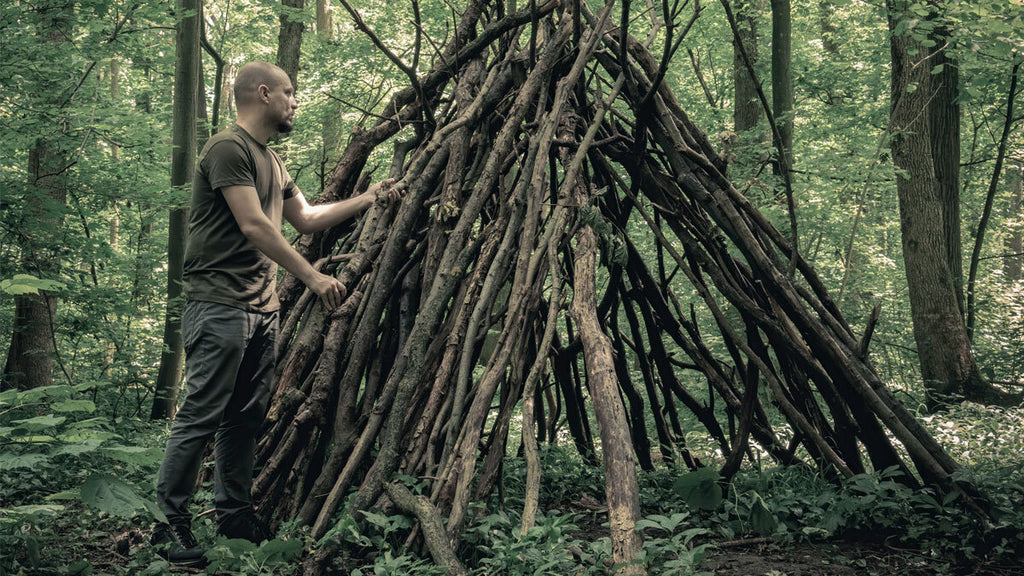
2. A-Frame
Another fast, simple shelter is the A-frame. Like the lean-to, the A-frame matches its name. Once built, the frame resembles the letter A.
The main difference between a lean-to and an A-frame is that an A-frame has two sides rather than one.
Follow these steps to build an A-frame shelter quickly using only things found in the woods.
- Find a long, sturdy tree limb or branch. Make sure it is taller than you are because this limb will determine the length of your shelter.
- Prop this long limb up on two shorter branches, making an A shape.
- Lean smaller branches against the branch on both sides. Now you have an A-frame.
- Finish by covering the A-frame with leaves, branches, or other brush.
3. Tarp Shelter

There are many ways to utilize a tarp to build a shelter. It'll be even easier to build simpler shelters with a tarp if you have bungee cords or paracord and carabiners.
Here are instructions for building a tarp tent:
- Lay your tarp out square on the floor. Peg out the two corners facing into the wind, using the attachment points next to the corner rather than directly in the corner. Tuck the corner underneath the tarp. This will be the back of your tent.
- Now come to the front two corners. Bring each corner attachment point to the next attachment point along the front edge of your tarp and peg them down. You should only peg down the corner attachment points. Your tarp should now be roughly trapezoid in shape.
- Place your pole or stick inside the tarp, towards the front, and turn it vertically. Take care not to bend a pole and make sure your stick won't pierce the tent. You may find you have to adjust the length of your support to get the correct tension on your tent. Alternatively, try moving the support further backward or forward. Your tarp should be taking shape as a tent.
- The door portion of your tent will be hanging loose. You should have attachment points halfway up on either side. Attach guy lines to both of these and peg them backward, along the side of your tent, to tension your door.
- You can either peg out the flap above the door or let it hang as it is. Adjust the pegs and your setup to have a more open or closed door. Use any spare pegs you have to pin your tent to the ground.
You can also use a tarp to create an A-frame shelter and a lean-to shelter. Your wall is made with the tarp rather than limbs and debris.
While any tarp is better than nothing, it’s best to choose a tarp made of thick, durable materials.
The Ready Hour Deluxe Thermal Blanket is excellent for all outdoor adventurers.
It is made of riveted polymer and a metallic coating that shields against moisture and cold temperatures. The aluminized, reflective layer captures 90% of your body heat and warms you.
While designed as a blanket to keep you dry and warm, it also works well to create a hanging shelter because it includes reinforced grommets.
The Ready Hour Deluxe Thermal Blanket only weighs 11.5 ounces, so you can keep it in your go-bag, trunk, or hiking backpack.
4. Fallen Tree Shelter
If you find yourself stuck in the wilderness near a fallen tree, you're in luck. You can use the fallen tree to create a simple shelter in minutes.
Simply look for a tree with room for you to fit under or crawl under.
Use fallen branches to lean against the side of the tree to create a wall. This will protect you from the wind. The more branches you use, the thicker your wall will be. Plus, you can build a fire on the open side of the fallen tree shelter to help keep you warm.
5. Snow Shelter

Should you find yourself in need of shelter in harsh winter elements, a snow trench shelter is one of the simple shelters you can build.
- Start by digging out the snow to match the length of your body.
- Then, pack the snow to build a solid snow wall on the perimeter, leaving space for an opening to enter.
- Add brush all along the inside of the snow trench, covering the bottom and the sides.
- Next, place branches or poles across the top of the snow trench.
- On top of the poles or branches, add heavy brush to cover the trench completely.
- Cover the top layer of brush with snow.
You can crawl inside the snow shelter to stay out of extreme weather.
Check out this video from Norwegian Bushcraft to see it built in 15 minutes.
6. Emergency Survival Tent
If you want to ensure you will always have a shelter when you need one, invest in an emergency survival tent.
Emergency survival tents by Ready Hour are made of high-tensile, aluminized polyester. The material then utilizes your body temperature to keep the inside of the enclosure warm.
In addition, the extra thick material is designed to repel water and snow. Plus, it blocks harsh winds.
Unlike most other emergency shelters, such as tarp tents, the Ready Hour emergency tent also provides ground cover.
The set includes everything needed to set up the tent quickly. Using the included paracord, you can hang the tent from any object.
Given the small size (6” x 3”; 8.7 oz), you can keep the emergency tent stored safely in your hiking bag for when needed.
These shelters can save your life in an emergency! Have you built any of these shelters? Let us know about it in the comments below!
Alicia Slyman
Thanks for posting . I have three of the survival sleeping bags for body thermal mass but I will look for the survival tent. Mine is a 10 person blackout tent. It does not just pop open to use. :-)
Berni L Page
Great simple information. Thanks
Lou Ellen Parrish
Enjoyed reading this,,,,!!!! Love more info!!
Sarah Querry
Some very good information when I was younger I member doing some of these ! I am going to pass this on to family members thank you
Will
Very good infromation, could be better with pictures of the shelter looks like completed.